If you’ve seen our cool Youtube video about making an AI Talking Pumpkin (or Whatever) Head, and you’re looking for links to software and resources, look no further!
About this Project
This video takes us through a very brief tutorial on how to do a style transfer form of AI on videos, in order to generate a realistic talking pumpkin/Jack-O-Lantern head. It may seem like just a fun video, but there are also lots of great teaching concepts here. The best thing about it is that this is an activity that can largely be done by novice learners, using different kinds of pre-made software, without any real programming expertise required (though sometimes installing some of this software can be a bit of a hassle, these packages are generally pretty straightforward). Tumblehome is currently working on AI curriculum that incorporates visual/moving art into project lessons, and style transfer is one of the ideas that students can integrate into their final project presentations.
Teachers – here are just a few computational thinking concepts / AI thinking concepts that you can take away from this activity, that you can share with your students. Here are a few examples (and we will have more to come, that we will publish here on our website as our curriculum development project unfolds in the coming year):
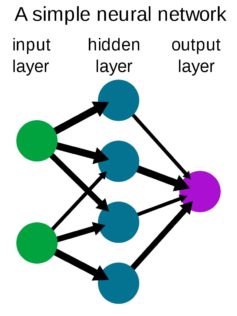 Neural Networks: neural networks are a type of AI deep learning, and thus a type of machine learning, and they use data input of different types to learn new information. This information can be used to help the network classify new information, or predict things, or even generate entirely new data (when two neural networks are used together, in the form of a GAN, they can be used to create totally new data, altogether). After training, neural networks yield a model, which can then be used and applied to new situations with new data inputs that it hasn’t seen before. In this case, the software in this system has a built-in trained model, that is being used, along with a keyframe input image to apply new styles to every frame in a video. It can use as little as a single image as input and with that, it can output limitless images, with a new style.
- AI System Training: Like a human baby learns from scratch, after encountering things a few times, AI systems also need to be trained with repetitive input data, as well. AI systems usually requires lots of data, but this particular system, which is very new, requires only one input image. This is a general trend in AI, that more systems are moving toward smaller models, less training data, and more efficiency. Sometimes this is referred to as one-shot or few-shot tech. With fewer training images, there are of course some drawbacks, but this technology continues to improve a lot over time. Considering that it took millions of images to train larger models less than a decade ago and just a few years ago, it took at least thousands to do a proper training, this technology has come a long way!
- Image/Video Overlay Logic: In the video editing/overlay program (in this case we used Openshot), we are presented with the problem that the video output from EBSynth is “shaky” and doesn’t match with the scenery in other video frames. So, we apply a mask image, in order to ensure that surrounding video stays still. Try creating different masks at different layers, to see how the video overlay program interprets them. Masks can be created either by making a PNG file with a transparent background (these can also be made in Windows Paint) or you can make a JPG file (or other general image file format) with a black background, and simply apply a Chroma Key effect on that video / image segment within OpenShot. The Chroma Key effect defaults to making the color black transparent. Try using different layers with different masks and overlays to see how that affects your video. This is what professional video producers do to make real TV programs. Making a longer video project can be a fun way for your class to demonstrate their understanding of key concepts. Try compiling video images at different frame rates and see what it does to the overall video once imported. Try to make multiple videos with masks on different layers. Try to use EBSyth with one image at a time to combine styles, and use these on various layers of their videos. This allows students to create incredibly complex scenes, and can help them understand some of the engineering and logic behind visual effects/movie magic, and why layering is so critically important in image and video programs.
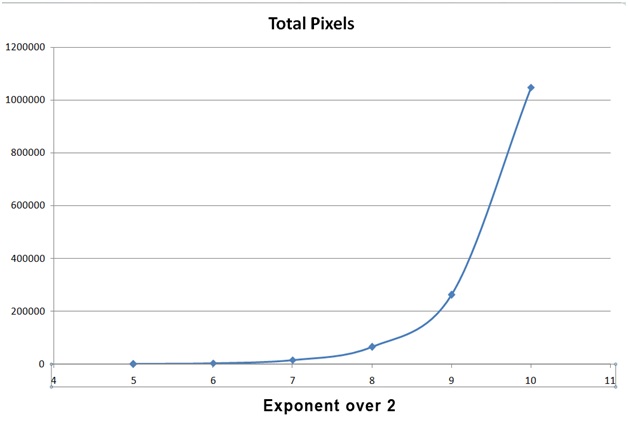
- Type and Size of Data (Math): This project deals with video, audio and image data. There are lots of fun math lessons that can be done around the idea of calculating different types of data. Video data is made up of a combination of a sequence of images, along with audio information. All three types of data are then brough back together to make a final video. There are lots of interesting things you will notice about how the data changes as you go through the process of deconstructing and remaking a video from images. As a video, the file may be fairly small, but as its constituent frames, the total data is much larger. Why is that? It brings up interesting discussions about data compression and why certain “compiled” forms of data are stored more efficiently by computers. There is also a great deal of math in this lesson as well. To calculate how much space an image takes up, think about how many pixels across and tall it is, and then multiply it by all the color information in each pixel (R, G, and B values). In fact, image files themselves may appear to be two dimensional, but they have more dimensions than most people realize, because of the color information in each pixel. The differences in the sizes of data, and why that’s important has a lot to do with the fact that this is binary data – (and binary data has only two options, 0 or 1 = 2n). Check out this chart, and discuss how a modern iPhone has 12MP of data, and why EbSynth and FFMpeg take so long to run (relatively speaking):
| Picture Dimension | (2^X)=2X | Exponent of 2 | Total Pixels |
| 32 | 2^5 | 5 | 1024 |
| 64 | 2^6 | 6 | 4096 |
| 128 | 2^7 | 7 | 16384 |
| 256 | 2^8 | 8 | 65536 |
| 512 | 2^9 | 9 | 262144 |
| 1024 | 2^10 | 10 | 1048576 |
When graphed, this data looks like the below image (it’s exponential, which means it’s non-linear and that’s why it doesn’t look like a line!)
 Thinking about this in terms of actual pictures , it is easier to see this exponential increase in image data as the picture dimensions increase only by a factor of 2; these images are to scale:
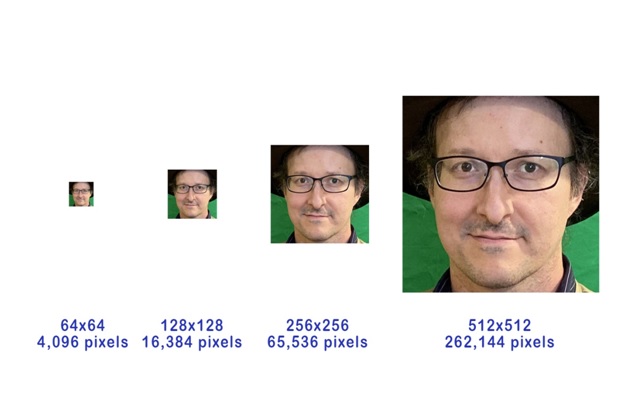
Software/Hardware We Used
All of the software to do this project is free and open source, works well on PC/Windows computers, and can work on other systems too. We used an Intel i7 system with the latest version of Windows as of 2020 and about 16GB of RAM and a state of the art Nvidia GPU but all of this can run well on systems with lower CPU speed, RAM and a standard motherboard-type GPU (essentially, no extra GPU). Please make sure you are downloading any software from valid sources (links below should work but please double check yourself) and please be aware that all this software can cause system conflicts. Here is what we used to make this video (teachers and parents: these links are to videos and software that Tumblehome did not develop and does not necessarily endorse – these links are being provided for educational purposes only). We encourage you to review these videos and links prior to allowing your students/child work with them to ensure that all content meets your own personal and school standards, and that nothing has changed since the publication of this blog that is out of our control:
-
-
- Ebsynth – https://ebsynth.com/ – This is a fairly straightforward GUI software with only a few options by default; note that there is a video about this software along with the download link right on the front page of this website. This software was originally developed as part of an AI research project specifically studying how to do full motion style transfer, with tracking, such that each image produced has some sort of coherence with the previous frame in the video. It’s sort of a complicated way of saying that it’s one of the first open source software packages developed that does full video style transfer so well, for the general public. Here is an introductory tutorial on EbSynth that is quite detailed here: https://www.youtube.com/watch?v=B_bfDgJGEv8&feature=emb_logo
- FFmpeg – https://ffmpeg.org/ – FFmpeg is generally used as a command line utility, that can be somewhat complicated for some first time computer users, but this is quite an old and well established software product and there are lots of support websites, and videos on Youtube. FFMPEG is how Here is one, that is very detailed: https://www.youtube.com/watch?v=MPV7JXTWPWI
- Audacity – https://www.audacityteam.org/download/ – this is a GUI software, that is fairly simple to use. Most of the tools that we used in our tutorial can be found under the “Effect” tab; play around with it yourself and try everything; it’s loads of fun playing with sounds.
- Openshot – https://www.openshot.org/ – this is a GUI video editor that takes a little bit of getting used to. This software has a great user guide, (https://www.openshot.org/user-guide/) and there are also plenty of videos online to support you.
- GIMP – https://www.gimp.org/ – GIMP is how we manipulated the alpha on the keyframe image, and also how we created the mask image for the final video. It is the most famous open source image editing tool, that works on multiple platforms. It is a competing product to Adobe Photoshop, only with fewer frills, and of course, with GIMP being fully open source, it’s totally free!
-
**Visit our main Tumblehome AI Resources Page with other links to great activities you can try, at all levels of knowledge about computers, math and AI
Sign up for FREE AI Resources:


